Stumpwork Ladybird Tutorial

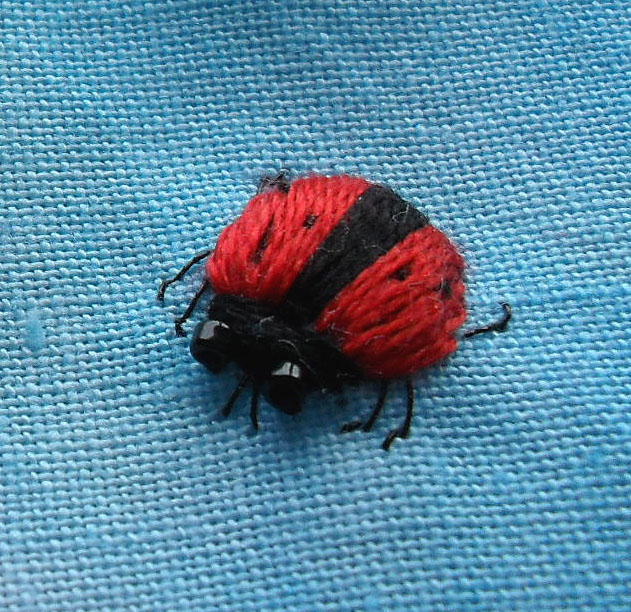
Today I have a tutorial for you helping you to create a ladybird (ladybug) in raised work. You can also vary the design, as you'll see at the end. The tute appeared in the spring 2012 edition of 'Crazy Quilt Gatherings', but I was disappointed to see that the photos and text got out of sequence in editing, with some text referring to incorrect photo numbers. If you saw that version and were confused, this should help clarify.=) Enjoy!


Cut an oval out of felt just a little smaller than half an inch or about one centimetre in length.  Usually I would use the same colour as the base stitches, but this shows up better for photographic purposes.


Stab stitch the felt oval into place, normally using a matching coloured sewing thread.  If you want to raise the bug’s body higher, then stab stitch a smaller oval underneath this one first.


Begin to cover the whole of the body with a smooth layer of satin stitches in two strands of black cotton.  Note that the stitches go across the body, not from head to ‘tail’.  Below is the completed satin stitch.  


Work three or four satin stitches across the top to form the head and then three or four more from just below the head to the back of the bug, fanning the stitches out very slightly.  You need to work these stitches in black, they are done in green here for clarity on this photo only.


Beginning at the centre next to the long stitches, begin to work satin stitches in two strands of red stranded cotton (or a shinier rayon or silk thread, if you prefer), making sure that they sit smoothly over the body and that they fan out a little in order to cover the whole of the sides too.  Below you can see the complete red thread work on the wings with the slight angle of the stitching showing.  (Sorry  this shot is a little blurred.)


Refasten on your black cotton and, taking care not to pull the stitches tight, work small horizontal seed stitches over some of the red threads (two at a time should be fine) to make the spots on the wings.  Make sure both sides are similar.

Whilst you’re still working with black, and if you need to, work another stitch or two under the head area to cover any felt that may have become visible when stitching the red wings.  I worked two, each going from the outside of the body to the centre forming a shallow ‘V’ shape.


With either plain black sewing thread or one strand of embroidery cotton sew on two black-based, regular sized seed beads for the eyes.  You can use plain black, but I’ve used a slightly iridescent shade here for added interest and sparkle.


Add in the legs and antennae using one strand of a very fine thread working from one back leg around the front and head to the other back leg.  The legs are worked in two straight stitches and one lazy daisy nearest to the body.  I used Kreinik Cord 105C here, which is a silver and black mix.


Here is your completed ladybird/bug!  Remember, you can make yours stand a little higher than mine by adding an extra, smaller oval of felt under the main one.

Variations

You can vary your bugs in a number of ways.  The first is a miniature version of much the same bug but just about half the size.  If you want to work one this small, remember to scale everything down including using petite beads for the eyes, one strand for wing spots, the finest thread you can find for legs, which you should also shorten a little, and don’t use extra padding for the body.


Here’s a 14 spot ladybird worked in a light tan stranded cotton and with extra wing spots.


This green leaf beetle’s iridescent wings were worked in two strands of Kreinik blending filament shade 085.  As you might remember from the stumpwork beetle tute (which this whole tute is based on the technique from), you can also get a good effect with DMC Stranded Metallic in the emerald green shade.


This shining flower chafer was worked with Anchor Lamé thread – a 12 stranded, fairly smooth metallic.  The cross-ways stitches from step 3 were worked in the same light tan shade used for the 14 spot ladybird.

Finally, here they all are together.  You can see the difference in size between the regular and mini ladybirds very well in this shot.


I hope you enjoyed this tutorial.=)  If you work a little bug of your own, please leave a link to it in the comments section below and share your success with everyone.

Text and images © Elizabeth Braun 2012

Starting out on the Ring of Roses

I've made a good start on the new hardanger scatter cushion/pillow cover design - my fifth! Here's the status after 2 hours' work.  I managed to get this 99% correct, just got one stitch on the first flower too long.  I considered leaving it, but feared it might show and I would have to do all the flowers 'wrong' to hide it, so I re-did it.


And I'm not sure how many more hours there are here as I didn't look at the clock after the DVD miniseries I was watching finished. I had to re-do one part twice as I managed to miscount the starting place - possibly the worst mistake you can make bar cutting the wrong threads! Got it right in the end though and pressed on forward without the telly distracting me.....


I just love the colours in this one and hope to get both the outer ring of boring, but almost compulsive (you just have to press on and complete them) Kloster blocks done today and make a good start on the outer ring of roses - 8 of them.  I was considering inserting some cutwork areas outside the outer floral parts in the four corners, but I think it will be fine without them after all and, frankly, working out the chart for them would be a pain and it can be hard enough to follow someone else's without having to graph your own as well!=)

Next post should be a good catch up on TAST. I'm up to date with most of the stitch samples, just need to do the last two or three and sort out some photos etc. Oh, and there's a stumpwork ladybird coming up very soon too, so those of you who are here for the stumpwork posts will want to look out for that.  I'm enjoying simpler work at the moment.

Text and images © Elizabeth Braun 2012

Weddings coming up!

Two weddings are happening within the next 3 months and so I'm already well on with the gifts for the first one (in mid-August).  I've done the card and have got everything ready to start stitching for the gift.

<-This is the design I used for the card.  As you can probably see, it's part of a long, narrow sampler design and is by Patricia Bage of Patricia Ann's Designs.  It's from her 'Beginners Guide to Drawn Thread Embroidery'.  I just used this central square and then added a line a silver cross stitches around the outside as it was really too small for the card blank. Yes, the fabric is lilac, but it hasn't shown up well here.


Here's the floss toss for the gift.  The design is the 'ring of roses' you can see on the right, here finished up as a table centre, but I'm going to work it as a cushion/pillow cover as it's more practical and, frankly, I can't stand buttonhole edging.  Caleb, I love ya, but not enough for all that edging!!!  I'll probably also change the woven filling for wrapped bars as they're quicker and, by the time I get to that stage, I'll be ready to do something else, no doubt.  The flowers are to be worked in these pretty yellows as I thought that would be easier to fit in with whatever colour scheme they chose for whichever room they want to use it in than the reds I'd originally planned to do with this design.  Anyway, I expect to be starting on the satin stitching this evening.


This next bit is for Cynthia who, after the room re-organisation post, wanted to see whole room shots.  That's quite a challenge as the room is so small!  However, nothing loathe, here is the view of the (messy) desk area, which is wall to wall as you see, and was taken from as far back in the doorway as I could reasonably stand.


This second shot shows the bookshelves joining on to the new shelves and from that you can see how short that wall is.


So, I live in a rather tiny space, but I think I've got it about as close to optimised as one could hope for.  There's no comfy chair in there for stitching, that's why that takes place in the roomier living room.  And, if we do move closer into town as Sir wants (and part of me does too), then I will almost certainly lose my room and we'll end up sharing a second bedroom as a study.  Not as good, but still far better than being restricted to the dining table, no?=)

Text and images © Elizabeth Braun 2012

Room Re-Organization

This was L-O-N-G overdue, but it got delayed whilst waiting to have the shelves up etc etc etc.  Anyway, here are some before and afters, including what's in the drawers. Well, I'd want to look in yours....:)

Starting at the top with what used to be a blank wall space between my framed degree certificate and the old fabric bins.   Here you can see how it used to be and how it looks now.  A lot less bare, isn't it?

Then we come to what's in the drawers.  You've seen the first drawer already, the one with all my metallic threads in.  Under that comes the general sewing drawer into which I also stuff my paper scissors!  They need a new home since their hook fell off the wall and I haven't got around to re-doing one.  Er-hum..


The third drawer contains my fabric colouring things - small tubs of silk paints, fabric paints and fabric dyes are in the box at the back.  The other two boxes contain tubes of acrylic and watercolour paints, although I do have other watercolours that are artists' quality in my white drawers.  Under that in the fourth drawer is card making materials.


Here are some of the drawers in the old Ikea wooden set of drawers on the shelf.  There are lots of highlighter pens and erasers in one, pencils and cheap coloured pencils in the other (with a big tin of Derwent Coloursoft good quality pencils just visible above), and there are two drawers to be seen underneath, one contained multi-coloured biros and one with various gel-type pens.


Moving down now to where the old bins were and where there is now a large 4-drawer tower, here are the general before and after shots.


Contents-wise, the top drawer has all my counted thread embroidery fabrics in, so Aida, Jobelan, Hardanger & Oslo and linens etc.  There are also white, cream and black fineweave fabrics including silk for surface embroideries at the front.  The second drawer contains general coloured fabrics.  You can see silks at the front of the left hand row of pieces and cottons etc behind.  On the right hand side of this drawer you can see rolls of cotton fabrics I got in Taiwan as well as some rolls and other pieces of sheer fabrics and some other, larger pieces of cotton and cotton mixes.


Drawer three contains my kits - the few that remain after my having sold quite a few in recent e-bay sales, some sewing paper patterns and what I call auxiliary fabrics such as Romeo, interfacing, Bondaweb and also stuff like felt.  The bottom drawer is where I keep fancy fabrics and is mostly made up of offcuts that I bought in Taiwan supplemented by some offcuts that were given to me by mill workers when I was 12-ish and my dad rented a workshop on their top floor.  I was given lots of ends of reels of Lurex and some scraps and small pieces of the fabrics made with it.


And here are two quick shots, before and after, from the right hand under-desk area.  Both the plastic and the wooden drawer sets are now out and in a more user-friendly place and the boxes at the back have been whittled down - two are on the new shelves and one was emptied into the bottom drawer of this plastic unit.


So, now I feel much more comfy and really enjoy working in there.  I don't stitch in my study, although I do design in there, when relevant.  With the exception of the current project bag and my old wooden workbox, everything else is stored in here at least.

I hope you enjoyed this post, 'cos it took forever to get the photos lined up right, and they may well have gone pear-shaped on your screen anyway, as it'll be different from mine....

Text and images © Elizabeth Braun 2012

The Bluuuue Planet!

When I did my reader survey back in November a few readers commented positively on my 'unusual subjects' for embroidery.  I'd never really thought of them as being out of the ordinary - I just stitch what appeals to me, but I suppose the goldwork viola (string instrument, not the flower), cross stitched narrowboat and perhaps some others are relatively unusual topics for stitching.  (Made me also wonder what 'normal' subjects are and, other than flowers, butterflies and birds, I can't think of much.  Anyone??)  Well, I think this latest piece will also qualify.

I've known for years that far more of the Earth's surface area is covered by water than it is by land, but it was really brought home to me over the past few days whilst stitching DH's anniversary card.  I saw this in 'New Stitches' #143 - it's part of a horizontally long piece of all the planets in our solar system.  As Sir has been studying sustainable energy and other environmental science and technology subjects a lot over the past year, I thought this was the idea design for him - even if it is the 'wrong' side of the planet, (Europe, or even Asia, would have been more appropriate), and not very romantic...


I might use this second shot, or another like it, as part of my header photos one day.


I also made Sir this tie out of some of the lovely fabric I bought in Taiwan on our spring 2008 visit.  He already has one with Chinese characters on from a museum shop in Taiwan and another with old style Korean hangul (i.e. not the totally modernised script) which we got in a Seoul gift shop, so I knew he'd go for this one.  I got the pattern from the Purl Bee blog and adapted it as needed.  It's ended up being narrower at the front than a commercial one, but hasn't come out too badly, all things considered.=)

A whole month since the last post, where have I been?  Running two lots of e-bay auctions that were rather a wash-out, amongst the usual being under the weather etc.  Oh yes, and I finally got all the drawers etc sorted out in my room.  I've done photos and so I need to post them to show anyone interested.=)

I've now 'awarded' myself two 'give the brain a rest' weeks where I won't be reading study books, doing research, learning languages, making notes for the books I'm planning to write and so on.  It's creative things - stitching, art, maybe even music; novels and getting some niggling jobs done as well, which include some mending and altering, but also making up another cushion cover and a case for my camera out of more lovely Taiwanese fabric.  So, I hope to have more to post during the second half of the month.

Text and images © Elizabeth Braun 2012

Sampler Update

Just a quick post to show you the current status on the sampler.  I haven't got very much further with it, or put in so much as one stitch on any other projects, because I've been really ill (and still am, rather) with yet another nasty virus.  I'm longing to get well enough to get on with things, esp. as I've a nice idea for a small piece with the recent TAST stitches, which I am, of course, 3 weeks behind with.

Anyway, here's how the sampler was at 8½ hours after finishing off the cross stitching (very bitty and slow) around the hardanger area and whilst watching Simon Reeve travel around the rim of the Indian Ocean and a team of enviably fit chaps row from the northernmost town in Canada to the 1996 magnetic north pole!


And this is half an hour's work later after having attached a number of beads.  I thought a different angle shot would add some variety.=)


Other than that, I still haven't got the shelves up in my room, so I can't show all that yet, but Sir might be able to do them soon, so there exists a hope for my sanity!!  I did, at least, manage to meet most of my April stitching goals, so that was something, but I haven't even been able to blog that until now, already the 12th of May!  I'm not setting any for the remainder of this month.

Hopefully, I'll be able to show something more soon.....(the usual lame plea!)

Text and images © Elizabeth Braun 2012

Thread Re-Organisation

OK, first the disclaimer, this is NOT meant as a don't-you-wish-you-had-as-much-thread-as-me brag, but just a celebration of the fact that I finally got the new pearl #12 balls settled in to their new homes and did the necessary re-organisation of some of the rest of the threads in the process.  That bag of new threads had been hanging around for quite long enough and I really wasn't sure how I was going to go about fitting stuff in the various boxes in a logical manner.  I don't like having part of one type of thread here and the other part there, so this is more sensible, I feel.=)  The gaps you can see here, on the left at least, are for the three balls which haven't yet arrived from the on-line LNS - one more each in yellow, orange and green.


First of all I managed to fit all the pearl 12's into the drawer at the bottom of my main workbox.  This box now holds, basically, plain threads.  There are stranded cottons and coton à broder #16s in the central box section and rayons (Marlitt) and Pipers Silks cops in the right hand cantilever with black and white pearls etc on top.


In the left hand cantilever, I used to keep tools and wires in the top (which are still there), Carons and some Kreiniks underneath with the remaining Kreiniks at the bottom.  This meant that metallics were part in this box and part in the blue one, with one or two more in my machine threads tin.  Now the cantilever holds just pearl cotton #8 balls, which used to be part in the drawer with the old 12s and part in the blue box.  How they're all together and much more user-friendly.  I can see and be much more inspired by the colours this way.=)


Speaking of being inspired by the colours, I put all the metallics in the top drawer of my smaller 4-drawer set (which I will soon show, along with the larger one for fabrics and kits - as soon as the shelves in my room go up and all can be sorted out well).  I used to have all these Kreinik spools with only the label showing in my cantilever sections.  I could see the colour number and they were all ordered according to thread type/thickness and in numerical order, so it was tidy.  However, this is much more inspiring, don't you agree?


This is the view from the bottom, as there are two rows in there.  As you can see from both these shots, I've now arranged them according to colour family.


Finally, this is the box with the multi-coloured pearl cottons, both in #5 and #8, along with the Carons.  I don't often use those these days, so having them in my main workbox wasn't necessary.  Plain threads get the most usage, even if they're not as pretty as metallic and variegated ones.=)


Now, if that doesn't make you want to stitch, I don't know what will!!!=)

Text and images © Elizabeth Braun 2012