Thanks to all who left comments on the last post showing the almost complete scatter cushion cover. I've got the right sized zip for it now and just need to get it inserted.
To answer the questions asked in the comments:
No, I didn't design the hardanger embroidery myself, it's from Mary Hickmott's 'Flowers with Hardanger' booklet and I used the 'Ring of Roses' table centre design, but just missed out the outer buttonhole edging (which I hate doing!) and turned the rest of the pattern into a scatter cushion cover instead.
I was also asked about the threads used (linhas = threads), and they were Anchor #5, #8 and a little #12 pearl cottons. The surface parts are all worked in #5 pearl cotton.
And Faith, hardanger is really very simple, it just looks complex. When I first saw it, the catalogue said 'only you will know how simple it is' and it's true. You just need a good, step-by-step set of instructions.
Yes, I should be doing the C&G locally in Sheffield (as long as it goes ahead OK - nothing 100% yet) and, yes, of course I will keep you all posted on what we do! Would I keep that from you??
I've set some more e-bay auctions going. There are some cross stitch, hardanger and other counted thread designs going as well as the design, instructions and most of the threads for the goldwork string instrument. There are also one or two dress patterns, watercolour paints and other bits and bobs. All should have international visibility.
The last thing is just a small reminder as, following my stumpwork ladybird tutorial, I came across one or two referring sites using my photos:
Please note that ALL photos (and text) here are copyright and may not be used without permission on any other site, including pinboard services. Prenez note s'il vous plaît, que toutes les photos (et texte) ici sont protégées par copyright et ne peuvent être utilisés sans autorisation sur n'importe quel autre site, y compris les services Pinterest etc. If you want to use something of mine, you only have to ask and I will very likely give permission (except for pinboard services, pinning to Pinterest already being disallowed as copyright cannot be controlled on those sites). You can ask in any language - je comprends français - and I will get to you just as soon as I can. Make sure you include contact details. More information is available on the Copyright page. Thanks! Merci!
Text and images © Elizabeth Braun 2012
Almost finished up now...
I can't believe it's almost two weeks since the last post. Tempus fugit, no? (That's 'time flies' for anyone with even less Latin than me!!) Anyway, although I decided to give myself a bit more time to complete the hardanger cushion cover, it's not got stalled over much and is still coming along well.

First of all, I completed the embroidery by adding in some filling stitches. Here you can see square filet in most of the filled squares and some spider's webs in the others. I used #8 pearl cotton for the square filet and #12 for the webs as planned and it looks fine.

Next, all the materials for the backing and finishing came out. I had most of them in stock already, and had only bought the ribbon trim from an 'end of roll' 50p bargain bucket! The yellow fabric is too thin to make a backing on its own, so I added in some old, cream cotton stuff as an extra layer there.
And then I laid them together to see how they looked

Finally, I got the machine out (yes, really!), and got on with the assembly. Here you can see it as it stands just now, only needing the zip inserting. I would have done this last week as planned, but the 12" (30cm) zip I had in stock was really too long and too awkward to fit in, so I went and bought a 10" (25cm) one yesterday.

Kate asked my how I kept my working fabric straight and taut whilst embroidering. Well, I use R&R craft frames, sometimes also Q Snaps and, of course, old fashioned wooden hoops at times. For this project I used the 14" R&R frame. These are a British made tool and come in 6", 9", 11", 14" and 17", whereas the US made Q-snaps are on sale in 8", 11" and 17" (I think - don't own this last size). All except the 6" R&R frame come to pieces and can be used to make up rectangles as well as squares. The two types of product are incompatible though, so, whereas I could create the 11"x17" frame I'm using for my current sampler work from my R&R frames, and have done 8"x11" with my Q-snaps, I can't do a 8"x14" using one of each. They're usually used for counted thread work, but I've often used them for surface work as well as I find they do hold fabric tight enough for that and sometimes the sizes are just far more convenient than a circle. Hope that helps.
Good news: Subject to a final financial 'review' in about 6 weeks, I should be joining back in with a City & Guilds Embroidery class from mid-September!=) I'll be 'dropping back' to level 2 this time as it's less work and I want to do the Stumpwork syllabus alongside (the teacher has agreed to 'tick the boxes' for me). Also, it gives me a chance to learn a few new things more slowly and, as it's only a one-year course, if I've had enough by the end of that, I can leave with a full certificate. So, I'm looking forward to that very much! I liked the whole style of my old place better, but after a really good chat with the local teacher at her students' exhibition yesterday, I think I can work quite happily in this arrangement. Nothing's ideal anyway and I had trouble seeing how the old classes satisfied some elements of the syllabus too. Whilst most of the pieces looked more contemporary than suits my taste at this new place, the teacher said we have freedom to be ourselves, so I hope to be more 'pictorial' in my samples and pieces than most are. We'll have to see how it develops.
Non-stitching news is that I've also been invited to help out with a new textbook on English-Chinese translation for final year degree students. I'll be proof-reading the English - which means more than just checking grammar, it's also checking 100% correspondence with the Chinese text and also making comments on the actual content. I'm really excited about this one. I'll have my name in a language textbook in the acknowledgements section - yippee!!=) To be honest, I'd rather do this than make kits....
Text and images © Elizabeth Braun 2012

First of all, I completed the embroidery by adding in some filling stitches. Here you can see square filet in most of the filled squares and some spider's webs in the others. I used #8 pearl cotton for the square filet and #12 for the webs as planned and it looks fine.

Next, all the materials for the backing and finishing came out. I had most of them in stock already, and had only bought the ribbon trim from an 'end of roll' 50p bargain bucket! The yellow fabric is too thin to make a backing on its own, so I added in some old, cream cotton stuff as an extra layer there.
And then I laid them together to see how they looked

Finally, I got the machine out (yes, really!), and got on with the assembly. Here you can see it as it stands just now, only needing the zip inserting. I would have done this last week as planned, but the 12" (30cm) zip I had in stock was really too long and too awkward to fit in, so I went and bought a 10" (25cm) one yesterday.

Kate asked my how I kept my working fabric straight and taut whilst embroidering. Well, I use R&R craft frames, sometimes also Q Snaps and, of course, old fashioned wooden hoops at times. For this project I used the 14" R&R frame. These are a British made tool and come in 6", 9", 11", 14" and 17", whereas the US made Q-snaps are on sale in 8", 11" and 17" (I think - don't own this last size). All except the 6" R&R frame come to pieces and can be used to make up rectangles as well as squares. The two types of product are incompatible though, so, whereas I could create the 11"x17" frame I'm using for my current sampler work from my R&R frames, and have done 8"x11" with my Q-snaps, I can't do a 8"x14" using one of each. They're usually used for counted thread work, but I've often used them for surface work as well as I find they do hold fabric tight enough for that and sometimes the sizes are just far more convenient than a circle. Hope that helps.
Good news: Subject to a final financial 'review' in about 6 weeks, I should be joining back in with a City & Guilds Embroidery class from mid-September!=) I'll be 'dropping back' to level 2 this time as it's less work and I want to do the Stumpwork syllabus alongside (the teacher has agreed to 'tick the boxes' for me). Also, it gives me a chance to learn a few new things more slowly and, as it's only a one-year course, if I've had enough by the end of that, I can leave with a full certificate. So, I'm looking forward to that very much! I liked the whole style of my old place better, but after a really good chat with the local teacher at her students' exhibition yesterday, I think I can work quite happily in this arrangement. Nothing's ideal anyway and I had trouble seeing how the old classes satisfied some elements of the syllabus too. Whilst most of the pieces looked more contemporary than suits my taste at this new place, the teacher said we have freedom to be ourselves, so I hope to be more 'pictorial' in my samples and pieces than most are. We'll have to see how it develops.
Non-stitching news is that I've also been invited to help out with a new textbook on English-Chinese translation for final year degree students. I'll be proof-reading the English - which means more than just checking grammar, it's also checking 100% correspondence with the Chinese text and also making comments on the actual content. I'm really excited about this one. I'll have my name in a language textbook in the acknowledgements section - yippee!!=) To be honest, I'd rather do this than make kits....
Text and images © Elizabeth Braun 2012
Nearly Complete!
The 'Ring of Roses' is almost complete now, as far as the actual embroidery is concerned. In this series of pictures you can see how much of the wrapping of exposed threads I got done per day of work on the project. Some days I got a lot done, some very little and some none at all!


This is where it is at the moment and is now just waiting for the filling stitches to be inserted. After that, it's on to the finishing up part. As I want to have it ready for handover within the week, I need to get going on it as soon as I can.
 Ideally I'll like to have this piece completed and ready to hand over at the same time, but I don't really expect it. I did manage to get the second rose finished. The problem seems to be, not the wrapping direction (I tried the other way and it looked terrible!), but that the threads don't like being worked for very long compared to cotton based ones. So, I cut some of the length off and restarted with a better bit and it worked out OK.
I also saw someone else's version of the same kit and was interested to see how 'narrow' her roses had come out compared to the kit photo. I feel that mine are rather fatter, although I seem to be using the same amount of bullions per rose. I don't know how the model stitcher managed it, but I won't be able to get the same number of blooms in the space as they have.
I'm horribly behind with TAST and have hardly touched it for weeks on end! Maybe I'll catch up one day...
Here's something exciting though:

Earlier in the year I added my name to the mailing list for the crafts trade show with a view to getting some kits going at some point. Well, I'm still working on the idea, but it was really fun to see the first piece of mail (next year's show details) come through addressed to me at The Business!!! First of many, or less than even a flash in the pan? Time will tell....
Text and images © Elizabeth Braun 2012


This is where it is at the moment and is now just waiting for the filling stitches to be inserted. After that, it's on to the finishing up part. As I want to have it ready for handover within the week, I need to get going on it as soon as I can.

I also saw someone else's version of the same kit and was interested to see how 'narrow' her roses had come out compared to the kit photo. I feel that mine are rather fatter, although I seem to be using the same amount of bullions per rose. I don't know how the model stitcher managed it, but I won't be able to get the same number of blooms in the space as they have.
I'm horribly behind with TAST and have hardly touched it for weeks on end! Maybe I'll catch up one day...
Here's something exciting though:

Earlier in the year I added my name to the mailing list for the crafts trade show with a view to getting some kits going at some point. Well, I'm still working on the idea, but it was really fun to see the first piece of mail (next year's show details) come through addressed to me at The Business!!! First of many, or less than even a flash in the pan? Time will tell....
Text and images © Elizabeth Braun 2012
‘Ring of Roses' coming along beautifully
Well, the idea was to put in a bullion rose on the Brazilian piece each stitching session, but I'm afraid it got forgotten whilst I've been making such good progress on the Ring of Roses design!!
 As you can see, I didn't get very far the first session, (but I also didn't spend very long on it), so this is where I left it on Wednesday night.
However, I've made up for that since, helped greatly by enjoying a drama series at the same time (a relevant one, of course - I was watching 'The House of Elliot' with all it's lush 1920's designs, beaded embroidery trims and passion for textiles!!). I can't just sit watching telly with nothing to do - it seems such a dreadful waste of time to me, so I get on with some routine sort of stitching and so I left the piece at the point seen in the photo below when I left it on Thursday.

Last night, I finished off the surface work and even got the drawn threads cut and removed as well.

All that remains now is to wrap the exposed threads and then insert some filling stitches. I think I'll be using square filet filling on many of the 'holes', but I also want to include a few strategically placed spider's webs for variety and just 'cos they look nice. As they look better in #12 pearl cotton and now that there is one in shade 002 (antique white, which I often prefer to 001, bright white), I'll give that a trial and see how it looks.
Now I really must do some bullion roses though and I'll try wrapping the thread around the needle in the opposite direction, but the instructions say to wrap clockwise and, as it's an Edmar kit using their own threads, you would think they would know what they were talking about. However, it's worth a try, isn't it? I'd like both of these projects to be ready to hand over in two weeks time. The scatter cushion cover isn't far off complete and I've got the backing fabric, zip and some nice thick ribbon to use as a piping as well. The other piece isn't very big in total and I can present it in one of those oval shaped snap frames I was given a few years ago.
After a bit of a dry patch recently, I'm really enjoying my needlework again, so that's great! It's also a good thing to bear in mind - don't force yourself, (unless you have to for a deadline or something) to stitch if you're not feeling interested in it at the moment. Do something else for a while and the interest will probably return of its own accord later on. You also don't need to explain or apologise or make excuses for it, just go with it.=)
Oh yes, something I'd like to ask you regular readers for your opinion on. Rachel came up with, what I think is a great idea the other day. She suggested that, for as many of the gallery photos as possible, it would be good to provide links to any relevant tutorials and WIP posts and photos. What do you think about this? I've already added links to the tutes on the stumpwork and ribbon work pages and to the only project that really had its own label. I'm thinking of creating a special label that won't appear in the usual sidebar cloud, but will be used to create a link to a whole WIP series for each piece. I'm already starting with this piece. What do you think?
Text and images © Elizabeth Braun 2012
 As you can see, I didn't get very far the first session, (but I also didn't spend very long on it), so this is where I left it on Wednesday night.
However, I've made up for that since, helped greatly by enjoying a drama series at the same time (a relevant one, of course - I was watching 'The House of Elliot' with all it's lush 1920's designs, beaded embroidery trims and passion for textiles!!). I can't just sit watching telly with nothing to do - it seems such a dreadful waste of time to me, so I get on with some routine sort of stitching and so I left the piece at the point seen in the photo below when I left it on Thursday.

Last night, I finished off the surface work and even got the drawn threads cut and removed as well.

All that remains now is to wrap the exposed threads and then insert some filling stitches. I think I'll be using square filet filling on many of the 'holes', but I also want to include a few strategically placed spider's webs for variety and just 'cos they look nice. As they look better in #12 pearl cotton and now that there is one in shade 002 (antique white, which I often prefer to 001, bright white), I'll give that a trial and see how it looks.
Now I really must do some bullion roses though and I'll try wrapping the thread around the needle in the opposite direction, but the instructions say to wrap clockwise and, as it's an Edmar kit using their own threads, you would think they would know what they were talking about. However, it's worth a try, isn't it? I'd like both of these projects to be ready to hand over in two weeks time. The scatter cushion cover isn't far off complete and I've got the backing fabric, zip and some nice thick ribbon to use as a piping as well. The other piece isn't very big in total and I can present it in one of those oval shaped snap frames I was given a few years ago.
After a bit of a dry patch recently, I'm really enjoying my needlework again, so that's great! It's also a good thing to bear in mind - don't force yourself, (unless you have to for a deadline or something) to stitch if you're not feeling interested in it at the moment. Do something else for a while and the interest will probably return of its own accord later on. You also don't need to explain or apologise or make excuses for it, just go with it.=)
Oh yes, something I'd like to ask you regular readers for your opinion on. Rachel came up with, what I think is a great idea the other day. She suggested that, for as many of the gallery photos as possible, it would be good to provide links to any relevant tutorials and WIP posts and photos. What do you think about this? I've already added links to the tutes on the stumpwork and ribbon work pages and to the only project that really had its own label. I'm thinking of creating a special label that won't appear in the usual sidebar cloud, but will be used to create a link to a whole WIP series for each piece. I'm already starting with this piece. What do you think?
Text and images © Elizabeth Braun 2012
Roses, roses
Glad to see so many enjoyed the tutorial last week and welcome to 15 new subscribers, many of whom are Portuguese speaking - bemvenidos.=)
Today I have updates on the Ring of Roses hardanger design and, coincidentally with so many new Brazilian readers, my first go at a rolled rose in Brazilian threads etc.
First the scatter cushion cover after the third and then the fourth day's stitching.


It's coming along very well and I'm pleased with it, although I had to re-do some of the leaves as I'd got them way out. I decided that one space out in one direction was OK for the coloured motifs as they won't have threads cut, but one set of leaves was three out in both directions! One of the roses is slightly out too, but it doesn't show and so I decided to leave it as it is. I haven't been able to stitch on it since about Saturday as I was working away the other day and only took a small piece with me, so I hope to get chance to do some of the stems today.
Here is said small piece, I finally managed to get some bullions in the Brazilian Rolled Rose piece, which I'd like to get completely finished in the next 2 weeks or so.

This is worked with Edmar rayon thread and it's very tricky. The texture and how slippy it is I can cope with OK, but the fact that it twists against itself so much whilst you're doing the wraps for the bullion knots is really hard to deal with. You get one or two knots worked, and then the thread just goes mad and a knot completely fails. Also, the rose seems to me to be a good deal bigger than it appears on the kit photo. I'm wondering if I'm going to manage to get it all as tightly packed together as the style demands.
Anyway, the plan is to try and work a flower or so each day before getting on with the hardanger and see it slowly grow. I can deal with a few stops and starts each time without getting too upset with it, but more than that would drive me mad. Not sure I'll be keeping and working the larger Brazilian kit I own....
Oh gosh, yes, and it's blogoversary today, which means I'll be making some changes to the appearance of things. Last week I expanded the Pages and filled in the missing captions, so there's more to see there now. I split up the 'Counted Thread' page into 'Counted and Drawn Thread', 'Hardanger' and 'Cross Stitch Favourites'. Later on today I'll be changing a couple of colours and re-doing the header photos, so stay tuned for some small updates.
Text and images © Elizabeth Braun 2012
Today I have updates on the Ring of Roses hardanger design and, coincidentally with so many new Brazilian readers, my first go at a rolled rose in Brazilian threads etc.
First the scatter cushion cover after the third and then the fourth day's stitching.


It's coming along very well and I'm pleased with it, although I had to re-do some of the leaves as I'd got them way out. I decided that one space out in one direction was OK for the coloured motifs as they won't have threads cut, but one set of leaves was three out in both directions! One of the roses is slightly out too, but it doesn't show and so I decided to leave it as it is. I haven't been able to stitch on it since about Saturday as I was working away the other day and only took a small piece with me, so I hope to get chance to do some of the stems today.
Here is said small piece, I finally managed to get some bullions in the Brazilian Rolled Rose piece, which I'd like to get completely finished in the next 2 weeks or so.

This is worked with Edmar rayon thread and it's very tricky. The texture and how slippy it is I can cope with OK, but the fact that it twists against itself so much whilst you're doing the wraps for the bullion knots is really hard to deal with. You get one or two knots worked, and then the thread just goes mad and a knot completely fails. Also, the rose seems to me to be a good deal bigger than it appears on the kit photo. I'm wondering if I'm going to manage to get it all as tightly packed together as the style demands.
Anyway, the plan is to try and work a flower or so each day before getting on with the hardanger and see it slowly grow. I can deal with a few stops and starts each time without getting too upset with it, but more than that would drive me mad. Not sure I'll be keeping and working the larger Brazilian kit I own....
Oh gosh, yes, and it's blogoversary today, which means I'll be making some changes to the appearance of things. Last week I expanded the Pages and filled in the missing captions, so there's more to see there now. I split up the 'Counted Thread' page into 'Counted and Drawn Thread', 'Hardanger' and 'Cross Stitch Favourites'. Later on today I'll be changing a couple of colours and re-doing the header photos, so stay tuned for some small updates.
Text and images © Elizabeth Braun 2012
Stumpwork Ladybird Tutorial
Today I have a tutorial for you helping you to create a ladybird (ladybug) in raised work. You can also vary the design, as you'll see at the end. The tute appeared in the spring 2012 edition of 'Crazy Quilt Gatherings', but I was disappointed to see that the photos and text got out of sequence in editing, with some text referring to incorrect photo numbers. If you saw that version and were confused, this should help clarify.=) Enjoy!

Cut an oval out of felt just a little smaller than half an inch or about one centimetre in length. Usually I would use the same colour as the base stitches, but this shows up better for photographic purposes.

Stab stitch the felt oval into place, normally using a matching coloured sewing thread. If you want to raise the bug’s body higher, then stab stitch a smaller oval underneath this one first.

Begin to cover the whole of the body with a smooth layer of satin stitches in two strands of black cotton. Note that the stitches go across the body, not from head to ‘tail’. Below is the completed satin stitch.


Work three or four satin stitches across the top to form the head and then three or four more from just below the head to the back of the bug, fanning the stitches out very slightly. You need to work these stitches in black, they are done in green here for clarity on this photo only.

Beginning at the centre next to the long stitches, begin to work satin stitches in two strands of red stranded cotton (or a shinier rayon or silk thread, if you prefer), making sure that they sit smoothly over the body and that they fan out a little in order to cover the whole of the sides too. Below you can see the complete red thread work on the wings with the slight angle of the stitching showing. (Sorry this shot is a little blurred.)


With either plain black sewing thread or one strand of embroidery cotton sew on two black-based, regular sized seed beads for the eyes. You can use plain black, but I’ve used a slightly iridescent shade here for added interest and sparkle.

Add in the legs and antennae using one strand of a very fine thread working from one back leg around the front and head to the other back leg. The legs are worked in two straight stitches and one lazy daisy nearest to the body. I used Kreinik Cord 105C here, which is a silver and black mix.

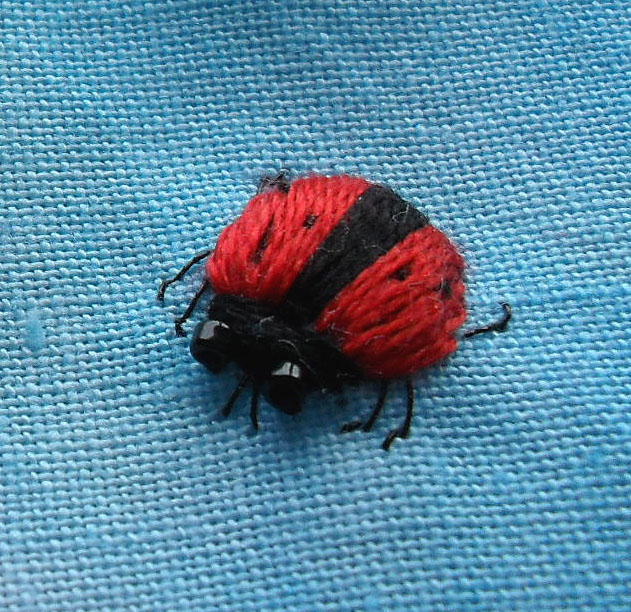
Here is your completed ladybird/bug! Remember, you can make yours stand a little higher than mine by adding an extra, smaller oval of felt under the main one.
Variations

You can vary your bugs in a number of ways. The first is a miniature version of much the same bug but just about half the size. If you want to work one this small, remember to scale everything down including using petite beads for the eyes, one strand for wing spots, the finest thread you can find for legs, which you should also shorten a little, and don’t use extra padding for the body.

Here’s a 14 spot ladybird worked in a light tan stranded cotton and with extra wing spots.

This green leaf beetle’s iridescent wings were worked in two strands of Kreinik blending filament shade 085. As you might remember from the stumpwork beetle tute (which this whole tute is based on the technique from), you can also get a good effect with DMC Stranded Metallic in the emerald green shade.

This shining flower chafer was worked with Anchor Lamé thread – a 12 stranded, fairly smooth metallic. The cross-ways stitches from step 3 were worked in the same light tan shade used for the 14 spot ladybird.
Finally, here they all are together. You can see the difference in size between the regular and mini ladybirds very well in this shot.

I hope you enjoyed this tutorial.=) If you work a little bug of your own, please leave a link to it in the comments section below and share your success with everyone.
Text and images © Elizabeth Braun 2012

Cut an oval out of felt just a little smaller than half an inch or about one centimetre in length. Usually I would use the same colour as the base stitches, but this shows up better for photographic purposes.

Stab stitch the felt oval into place, normally using a matching coloured sewing thread. If you want to raise the bug’s body higher, then stab stitch a smaller oval underneath this one first.

Begin to cover the whole of the body with a smooth layer of satin stitches in two strands of black cotton. Note that the stitches go across the body, not from head to ‘tail’. Below is the completed satin stitch.


Work three or four satin stitches across the top to form the head and then three or four more from just below the head to the back of the bug, fanning the stitches out very slightly. You need to work these stitches in black, they are done in green here for clarity on this photo only.

Beginning at the centre next to the long stitches, begin to work satin stitches in two strands of red stranded cotton (or a shinier rayon or silk thread, if you prefer), making sure that they sit smoothly over the body and that they fan out a little in order to cover the whole of the sides too. Below you can see the complete red thread work on the wings with the slight angle of the stitching showing. (Sorry this shot is a little blurred.)


Refasten on your black cotton and, taking care not to pull the stitches tight, work small horizontal seed stitches over some of the red threads (two at a time should be fine) to make the spots on the wings. Make sure both sides are similar.
Whilst you’re still working with black, and if you need to, work another stitch or two under the head area to cover any felt that may have become visible when stitching the red wings. I worked two, each going from the outside of the body to the centre forming a shallow ‘V’ shape.

With either plain black sewing thread or one strand of embroidery cotton sew on two black-based, regular sized seed beads for the eyes. You can use plain black, but I’ve used a slightly iridescent shade here for added interest and sparkle.

Add in the legs and antennae using one strand of a very fine thread working from one back leg around the front and head to the other back leg. The legs are worked in two straight stitches and one lazy daisy nearest to the body. I used Kreinik Cord 105C here, which is a silver and black mix.

Here is your completed ladybird/bug! Remember, you can make yours stand a little higher than mine by adding an extra, smaller oval of felt under the main one.
Variations
You can vary your bugs in a number of ways. The first is a miniature version of much the same bug but just about half the size. If you want to work one this small, remember to scale everything down including using petite beads for the eyes, one strand for wing spots, the finest thread you can find for legs, which you should also shorten a little, and don’t use extra padding for the body.

Here’s a 14 spot ladybird worked in a light tan stranded cotton and with extra wing spots.

This green leaf beetle’s iridescent wings were worked in two strands of Kreinik blending filament shade 085. As you might remember from the stumpwork beetle tute (which this whole tute is based on the technique from), you can also get a good effect with DMC Stranded Metallic in the emerald green shade.

This shining flower chafer was worked with Anchor Lamé thread – a 12 stranded, fairly smooth metallic. The cross-ways stitches from step 3 were worked in the same light tan shade used for the 14 spot ladybird.
Finally, here they all are together. You can see the difference in size between the regular and mini ladybirds very well in this shot.

I hope you enjoyed this tutorial.=) If you work a little bug of your own, please leave a link to it in the comments section below and share your success with everyone.
Text and images © Elizabeth Braun 2012
Starting out on the Ring of Roses
I've made a good start on the new hardanger scatter cushion/pillow cover design - my fifth! Here's the status after 2 hours' work. I managed to get this 99% correct, just got one stitch on the first flower too long. I considered leaving it, but feared it might show and I would have to do all the flowers 'wrong' to hide it, so I re-did it.

And I'm not sure how many more hours there are here as I didn't look at the clock after the DVD miniseries I was watching finished. I had to re-do one part twice as I managed to miscount the starting place - possibly the worst mistake you can make bar cutting the wrong threads! Got it right in the end though and pressed on forward without the telly distracting me.....

I just love the colours in this one and hope to get both the outer ring of boring, but almost compulsive (you just have to press on and complete them) Kloster blocks done today and make a good start on the outer ring of roses - 8 of them. I was considering inserting some cutwork areas outside the outer floral parts in the four corners, but I think it will be fine without them after all and, frankly, working out the chart for them would be a pain and it can be hard enough to follow someone else's without having to graph your own as well!=)
Next post should be a good catch up on TAST. I'm up to date with most of the stitch samples, just need to do the last two or three and sort out some photos etc. Oh, and there's a stumpwork ladybird coming up very soon too, so those of you who are here for the stumpwork posts will want to look out for that. I'm enjoying simpler work at the moment.
Text and images © Elizabeth Braun 2012

And I'm not sure how many more hours there are here as I didn't look at the clock after the DVD miniseries I was watching finished. I had to re-do one part twice as I managed to miscount the starting place - possibly the worst mistake you can make bar cutting the wrong threads! Got it right in the end though and pressed on forward without the telly distracting me.....

I just love the colours in this one and hope to get both the outer ring of boring, but almost compulsive (you just have to press on and complete them) Kloster blocks done today and make a good start on the outer ring of roses - 8 of them. I was considering inserting some cutwork areas outside the outer floral parts in the four corners, but I think it will be fine without them after all and, frankly, working out the chart for them would be a pain and it can be hard enough to follow someone else's without having to graph your own as well!=)
Next post should be a good catch up on TAST. I'm up to date with most of the stitch samples, just need to do the last two or three and sort out some photos etc. Oh, and there's a stumpwork ladybird coming up very soon too, so those of you who are here for the stumpwork posts will want to look out for that. I'm enjoying simpler work at the moment.
Text and images © Elizabeth Braun 2012


