 I decided to make a start today on the small stumpwork kit I posted in my last. It's one of the six kits that DMC used to make, but has long been off the market. I bought five of them, two of which came from a discount seller on e-bay who'd clearly got hold of a lot of end of line kits to sell on. They do still crop up on e-bay from time to time, for anyone whose interested.
 I like kits as a general rule and feel a good deal more relaxed when working one than I do when working my own design. It's the security of having full instructions, and even some illustrations, that makes the difference, I think. There are kits and kits though, and this is definitely of the mass produced, cheap and (usually) cheerful type. The things I dislike most are the thin, cheap looking pieces of calico you're given to work your piece on and the fact that pattern lines are printed so thickly onto it. I decided to work the stem stitch part in three strands as opposed to the recommended two just so as to have some hope of full coverage! It didn't quite work, but it's near enough for what I'm thinking of as more or less a practice/learning piece.
The large leaf presented a slight challenge in that you're expected to stitch at an angle. As you can see here, I drew in the centre vein and some angle stitch guidelines to help. Outlining in stem stitch wasn't part of the instructions, but I feel that doing this both helps make sure you cover the printed lines and also raises the edge of the stitches somewhat.
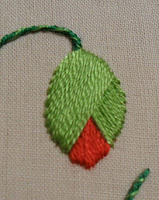
The bud was a point of interest too. I felt that the way it was done on the model in the photo looked rather bad, to say nothing of probably not very lifelike, so I changed it. Here you can see the process of doing one part, the under sepal, in one layer of satin stitch, part of which provided padding for the top layer. I'm not sure I'm wholly impressed with the final result of it. In fact, I'm wondering if it's any better than the original! Still, this is a learning process....
Here's the status at the moment of the whole piece with all the flatwork completed. It didn't take very long to do, especially as there's just one large leaf as opposed to the several small ones on the last DMC kit I worked. If all goes according to plan, tomorrow I hope to get to the green and black beetle and, if possible, make a start on the detached poppy petals. See you then!
© Elizabeth Braun 2011


