Another Wednesday and here's the current state of play on my Works in Slow Progress. First of all, the sampler:
I've done a slight bit more than you can see here since the photo was taken, i.e. have put in the lazy daisy stitches on the rest of the upper left hand bit of the rose scroll. You might notice that I decided to replace those erroneous blue stitches after all and I think it looks a lot better now. The blue didn't make a good contrast, it just confused matters and it looks a lot more like roses now, instead of just clumps of dots!
I also got the stumpwork rabbit going again. Here's the photo from the book I'm working from with all the threads I'm using as well.
I completed the shading of the head as you can see. However, I'm not at all pleased with it and am seriously considering starting all over again with it. I certainly do want to re-do the lower part of the head and the eye area as I've not used dark enough thread - I used the second darkest instead of the very darkest, but it needs to recede somewhat, being the furthest part away. So, that's up to be re-done.
I haven't done anything on the peacock feather as yet as I haven't been out to get the 9" hoop, (which I'm assured can indeed be bought from Hobbycraft - there weren't any available when I was buying all my hoops a few years ago), but I hope to do that soon. I'm not in the market for any fancy frame systems and I find wooden stretched frames much too heavy for me to hold and need too much umph to get set up. So, I'll get the missing size of hoop. I like hoops. If they're good enough for the likes of Helen M Stevens, then they're good enough for me!=)
Text and images © Elizabeth Braun 2012
Work In Progress Wednesday - 24 Oct 2012
Not too much to show off this week, I'm sorry to say. There are two or three hours work displayed on the sampler here.
It takes such a long time to achieve anything on this one, especially the cross stitched parts as they're so 'bitty' - a couple of stitches here, three in a row there, a single one over here, and so on. I also discovered that I'd misread one of the symbols whilst stitching the upper part, thus the rose centres ended up being teal blue instead of deep lilac!! I might replace it, I might not.=)
Oh and Sharon, you may have told me the piece was lovely before, I don't remember exactly, but I haven't the least objection to being told it as many times as you like!!! Might help with motivation....
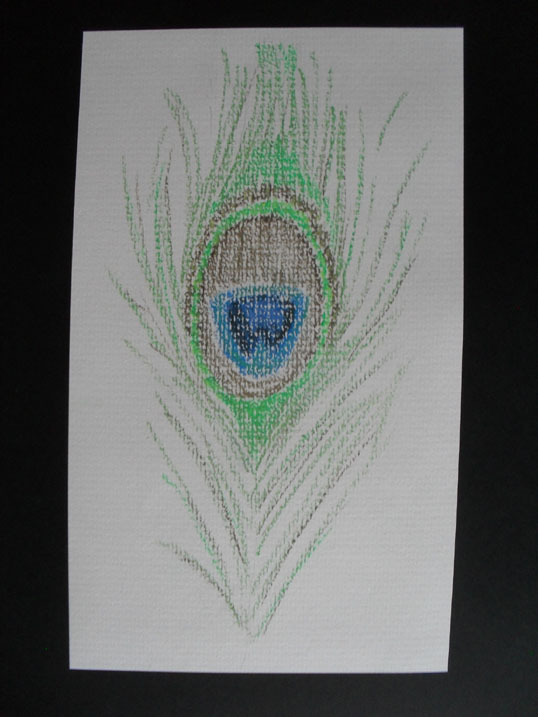
Now onto the peacock feather piece. One or two mentioned last time that they were intrigued as to what I was going to do with it. Well, I am a bit that way out myself, if I'm truthful!! The idea is to continue to couch rows of rayon threads so that they end up something like this picture I did from a real feather (I think - it was a few years ago and may even have been from a photo) below:
I haven't done any more of the stitching yet, but I have pressed the fabric, got the necessary threads out and trialled a couple of possible work frames. If only I had a 9 inch hoop! Are such things made, do you know?
Text and images © Elizabeth Braun 2012
It takes such a long time to achieve anything on this one, especially the cross stitched parts as they're so 'bitty' - a couple of stitches here, three in a row there, a single one over here, and so on. I also discovered that I'd misread one of the symbols whilst stitching the upper part, thus the rose centres ended up being teal blue instead of deep lilac!! I might replace it, I might not.=)
Oh and Sharon, you may have told me the piece was lovely before, I don't remember exactly, but I haven't the least objection to being told it as many times as you like!!! Might help with motivation....
Now onto the peacock feather piece. One or two mentioned last time that they were intrigued as to what I was going to do with it. Well, I am a bit that way out myself, if I'm truthful!! The idea is to continue to couch rows of rayon threads so that they end up something like this picture I did from a real feather (I think - it was a few years ago and may even have been from a photo) below:
I haven't done any more of the stitching yet, but I have pressed the fabric, got the necessary threads out and trialled a couple of possible work frames. If only I had a 9 inch hoop! Are such things made, do you know?
Text and images © Elizabeth Braun 2012
The Sunday Yarn - 21 Oct 2012
This week has seen me working on two baby cardigans at once! I'm 'sharing' the size 10 (3.25mm) needles between the two patterns, which isn't strictly necessary as there are another two pairs in my mum's needle bag, but doing it this way makes me work on both and not just do the easy and quick one to the neglect of the slower, more complex design with the finer yarn as I have to make sure that the right guage needles are free at the right time.
I've got almost one sleeve done on the lemon piece. I do like this one - both the snuggly yarn (texture AND colour) and the pattern, but it takes a fair bit longer, of course. I've 30 rows left to do on this sleeve now. The first of the two balls of yarn is coming to an end and I'm beginning to get concerned that there'll be enough! I've decided not to even attempt matching mittens as I'm sure there won't be enough yarn for those.
I've also started this green version of the white one I've already done. This one is a size larger and, wouldn't you know it, the back is actually larger than the lemon back even though the lemon one is a size larger again! Go figure, as you American ladies say!=) Anyway, I plan to decorate this one with purple trims and flowers but, as it's a larger size, I doubt I'll have enough yarn for bootees as well, so I'll just settle for mittens this time.
That's all for this week, I'm afraid!
Text and images © Elizabeth Braun 2012
I've got almost one sleeve done on the lemon piece. I do like this one - both the snuggly yarn (texture AND colour) and the pattern, but it takes a fair bit longer, of course. I've 30 rows left to do on this sleeve now. The first of the two balls of yarn is coming to an end and I'm beginning to get concerned that there'll be enough! I've decided not to even attempt matching mittens as I'm sure there won't be enough yarn for those.
I've also started this green version of the white one I've already done. This one is a size larger and, wouldn't you know it, the back is actually larger than the lemon back even though the lemon one is a size larger again! Go figure, as you American ladies say!=) Anyway, I plan to decorate this one with purple trims and flowers but, as it's a larger size, I doubt I'll have enough yarn for bootees as well, so I'll just settle for mittens this time.
I was browsing the shop where I got the lemon yarn and found two balls of the flecked peachy-pink below going for only 99p each. There were also stacks of yellow ones, but I liked this one best and the shade seemed to me to be far more suited to a Chinese baby's colouring than our blue-ish pinks would be.
That's all for this week, I'm afraid!
Text and images © Elizabeth Braun 2012
Completed 'Rolled Roses' Brazilian Embroidery
I'm delighted to announce the completion - and successful framing - of my long-in-progress Brazilian embroidery piece! HURRAH!
Here are the last two WIP shots from last week. The first one was what I got done during the rest of the Wednesday that you last saw pictures on and the second is, I think, from the next day's work.
Text and images © Elizabeth Braun 2012
Here are the last two WIP shots from last week. The first one was what I got done during the rest of the Wednesday that you last saw pictures on and the second is, I think, from the next day's work.
After that, I just pressed on to completion and didn't take any more photos until the whole piece was done! This afternoon, I stretched it in an 8" embroidery hoop after spraying with a clean water spray to wet the fabric. It dried beautifully taut and ready for framing.
Last, but not least, I put it into one of those Anchor Flexi Hoop Frames (which I'll be detailing the process of soon, alongside some regular framing as Sir and I are doing a few of my pieces on Sunday afternoons together) and here is the completed item ready to be given as a gift to a lovely Japanese lady who put us up in her Oxford home last winter. I promised to do an embroidery for her and I think she'll like this!
Do you?
So, that's my first Brazilian piece done. How do I feel about it? Well, I'm quite pleased with the finished results, but it was rather tricky to work some of it. I'm not sure if I really enjoyed it in the final analysis and I can't really see myself ever working the larger kit I own - although I am interested in doing some small sections of it. Jury's out on this one, I think!
Work In Progress Wednesday - 17 Oct 2012
I haven't done much on the sampler this week, but this how it looks just now with the light flowers completed and the rest of the leaves put in around them.
Next up for completion is this funny looking object that long-term readers may remember from 4 years ago and my City & Guilds work. It's a sample in appliqué and couching and, when complete, should look rather more like a peacock feather than it does now!! So, I need to give some thought to how to proceed with this one and start doing a little on it as often as I can.
"But wait!" I hear you cry. "What happened to the Brazilian Rolled Rose piece?" Nothing bad has happened to it, in fact, I've finished it! I just need to stretch it a little before the final photos are taken and then it will have a post all to itself. Look out for that later in the week, all being well.=)
Text and images © Elizabeth Braun 2012
A Little Ribbon Embroidery
I've had a couple of Crafty Ribbons kits in my kit drawer for a while now and have been meaning to get them worked up. However, when looking at the designs, I couldn't help but feel that the best hadn't been made of its potential. This is the 'original', what do you think? You get a small square of black fabric to work it on and, yes, it's plenty big enough for the design, but really nothing like big enough to put in a hoop. In fact, although this is my fourth kit of this brand, I've never once used the fabric supplied in the package owing to its over small size.I decided that the first thing to do was to create a new background and, as I had three small projects in mind that I wanted non-plain backgrounds for (including another kit by CR, the colour choices for which make me wonder how they could bring themselves to put it into production....), I decided to have a go at a bit of painting. Below are the materials I thought I'd use, meaning to do natural, landscapey sorts of things with them.
And below again are the materials I actually used!!
This is what the piece of fabric with the three painted sections looked like when wet. Notice that I wet the whole area I wanted to paint first so that the colours merged and spread out well on the fabric.
And this is what it looked like dry - considerably lighter. As you can see from the tubes of paint photo, I've used watercolours and I really should have remembered how much lighter they dry. Having said that, I didn't really mind the change too much as I've made the mistake of having an over-poweringly painted background before. I also learned that Sap Green' dries with quite a hard edge (as does Permanent Rose to a degree) - something to look out for another time.
The middle of the three was the one intended for this ribbon piece as I wanted to give the impression of a pot of flowers in a yard with a wall/fence (the brown-ish colour) and some greenery (the green spots dropped into the brown whilst still wet), on a paved area (the grey at the bottom).
The embroidery itself took around an hour and, as it was done in evening light and was a quick stitch, there are no WIP photos this time, but here's the finished piece, mounted in a card and looking a lot nicer, I think!
Do you agree? I do like the general design and love the plant pot button - in fact I'm planning to get hold of a few, probably from the Crafty Ribbons booth at the Harrogate Knitting and Stitching Show, presuming they'll be there. So that part was good, but I think the black background, to say nothing of the awful slightly blurred and totally 'flat' photograph on the kit was a big no-no. Not surprisingly, I got this as part of a sale on their website - discontinued kits.
PS, In case anyone's wondering what's planned for the other two painted backgrounds, the simple answer is nothing. I found the green on the left hand one just too vibrant and felt it didn't go with the ribbon piece I had in mind and the right hand idea just no longer works for me. I was going to do a small sampler with a crazy quilt appearance as a support for my catch-up on TAST. I still quite like the idea, but don't think this one worked and so will consider trying another one soon.
Text and images © Elizabeth Braun 2012
The Sunday Yarn - 14 Oct 2012
I haven't done much knitting over the past week to be honest. My readers who are really only interested in my embroidery will be pleased to know that I've been pressing on with two projects there - one completed and the other not far off (no, not the sampler!!), so knitting has been a little neglected. Having said that, I managed to finish the back of the current baby cardigan I'm working on last night. What puzzles me is why the right hand armhole (when viewed like this, from the back) looks so much lower than the left when it really is only one row! Odd.
Another Ravelry (a HUGE yarncraft forum) member said she'd worked this pattern and that it had mistakes in it, so I'm a bit concerned about how it will go from here given that I'm only in the elementary stages of learning to knit. From looking at the pattern and comparing it to the photo, I actually can't see how the pattern corresponds to the top section of the left and right fronts, so I'll need to go carefully there. I think I'll take a break from this one for the time being as this is a 6-12 month old baby pattern and I still have a couple of 3-6 month ones I want to do. Doesn't make sense to do it this way around!!
The other day I got one of my stitching magazine IKEA files off the shelf to put away the latest issue of 'Stitch' (and the first one I've bought in over 3 years) and came across this:
I'd been looking for it all over the place! It'sf from a 1972 women's magazine and my mum must have saved it back then. She gave it to me in the early 1980s and I'd kept it ever since, just mislaid it recently when I decided to take up knitting seriously. It details how to work 60 different patterns, some with one colour but using cables and other fancy patterns and others with up to four different colours. Just what I wanted to learn some more pretty stuff!
So, I might do a little playing around with some of these and make some small samples soon. I wonder if anyone else has a copy of this still??=)
Text and images © Elizabeth Braun 2012
Another Ravelry (a HUGE yarncraft forum) member said she'd worked this pattern and that it had mistakes in it, so I'm a bit concerned about how it will go from here given that I'm only in the elementary stages of learning to knit. From looking at the pattern and comparing it to the photo, I actually can't see how the pattern corresponds to the top section of the left and right fronts, so I'll need to go carefully there. I think I'll take a break from this one for the time being as this is a 6-12 month old baby pattern and I still have a couple of 3-6 month ones I want to do. Doesn't make sense to do it this way around!!
The other day I got one of my stitching magazine IKEA files off the shelf to put away the latest issue of 'Stitch' (and the first one I've bought in over 3 years) and came across this:
I'd been looking for it all over the place! It'sf from a 1972 women's magazine and my mum must have saved it back then. She gave it to me in the early 1980s and I'd kept it ever since, just mislaid it recently when I decided to take up knitting seriously. It details how to work 60 different patterns, some with one colour but using cables and other fancy patterns and others with up to four different colours. Just what I wanted to learn some more pretty stuff!
So, I might do a little playing around with some of these and make some small samples soon. I wonder if anyone else has a copy of this still??=)
Text and images © Elizabeth Braun 2012